Blog

Counterparts Lite Update

There’s an update available today for Counterparts Lite. Here’s what’s new in version 1.3.2.

Squashed Bugs

The first has something to do with the currently-edited text not being saved if you close the document window before exiting the text editing mode. I’m pretty sure I saw someone complain about this a while ago in a review in the Mac App Store, but with the review lacking specifics and having no way to interact with the poster I failed to locate the problem.

The second could cause the app to misbehave after editing a key in a .strings file if the key is already present in the document. An alert would appear asking you what to do, and everything went wrong after that. That’s all fixed now.

Auto-update

For customers getting Counterparts Lite directly from the website (as opposed to getting it from the Mac App Store), you will notice that it now includes an auto-update feature.

30-day Free Trial

If you’re not a customer (yet), you can just download the app to start your free trial of 30 days. Visit the Counterparts Lite website to learn more.


Choosing a Window Level in Red Stripe and Sim Daltonism

In OS X, windows are grouped by level. Windows within a particular level can usually be reordered by clicking on one to bring it to the front, but that will only bring the window on top of all other windows of the level it belongs to. For instance, clicking on a document window won’t make it come on top of a floating palette, or the dock, because the floating palette and the dock belong to a higher level.

When writing code, you can choose the level a window belongs to by setting the windowLevel property on the window. The OS has many predefined window levels you can access using CGWindowLevelForKey with one of the keys defined in the CGWindowLevelKey enum. Calling that function returns an integer representing the level: windows with a higher level stay on top of those with a lower one.

Here is some code to check the predefined levels in a Swift 3 playground, with the result for OS X 10.11:

CGWindowLevelForKey(.baseWindow)                // -2147483648
CGWindowLevelForKey(.minimumWindow)             // -2147483643
CGWindowLevelForKey(.desktopWindow)             // -2147483623
CGWindowLevelForKey(.desktopIconWindow)         // -2147483603
CGWindowLevelForKey(.backstopMenu)              // -20
CGWindowLevelForKey(.normalWindow)              // 0
CGWindowLevelForKey(.floatingWindow)            // 3
CGWindowLevelForKey(.tornOffMenuWindow)         // 3
CGWindowLevelForKey(.modalPanelWindow)          // 8
CGWindowLevelForKey(.utilityWindow)             // 19
CGWindowLevelForKey(.dockWindow)                // 20
CGWindowLevelForKey(.mainMenuWindow)            // 24
CGWindowLevelForKey(.statusWindow)              // 25
CGWindowLevelForKey(.popUpMenuWindow)           // 101
CGWindowLevelForKey(.helpWindow)                // 200
CGWindowLevelForKey(.draggingWindow)            // 500
CGWindowLevelForKey(.screenSaverWindow)         // 1000
CGWindowLevelForKey(.assistiveTechHighWindow)   // 1500
CGWindowLevelForKey(.cursorWindow)              // 2147483630
CGWindowLevelForKey(.maximumWindow)             // 2147483631

When I wrote Red Stripe, I used the assistiveTechHighWindow level because the goal is to filter the screen to help differentiate colors, and to that end the window must sit on top of everything. Even the name is appropriate, since Red Stripe is an assistive technology.

Then I rewrote Sim Daltonism this January based on the code from Red Stripe. Sim Daltonism is basically the reverse of an assistive technology: it simulates color blindness. Unsurprisingly, there is no predefined window level for that. Like Red Stripe, it needs to sit on top of everything so it can filter the content behind the window, so at first I was using the same window level.

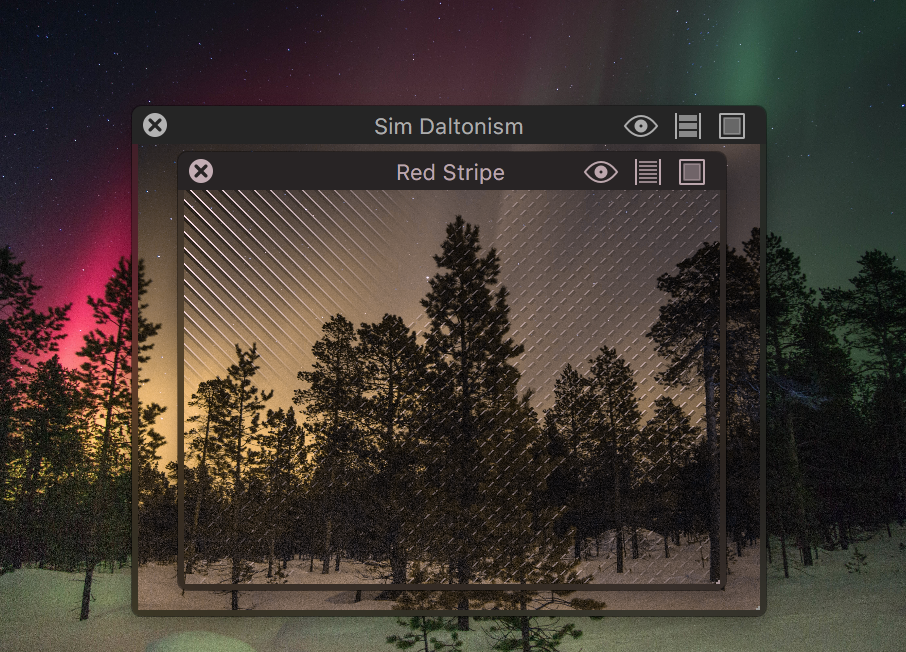
But at some point I tested the two apps together. It’s great that you can use Red Stripe to add a pattern to certain colors and then put Sim Daltonism on top to check as a not-color-blind person if you can make sense of the resulting image. Except that Red Stripe only works well when the Sim Daltonism window is above it, otherwise it gets an image which already lost its useful color information and adding stripes does not make sense.

So now Sim Daltonism uses the following non-standard window level to always stay on top of Red Stripe:

CGWindowLevelForKey(.assistiveTechHighWindow) + 1

This is basically a made-up window level, and it turns out the window server will happily accept that. Note that I’m keeping the level relative to the assistive tech window level, so if that level changes in a future version of OS X, the window will still be above it. If I hard-coded the value 1501 instead, it wouldn’t be as future proof.


Swift: Mixins using Protocol Extensions

Protocol extensions are a great feature of Swift 2. With a protocol extension we can add a method that will apply to every types conforming to a protocol. Other than extending types conforming to a protocol, another interesting use is to provide a default implementation for methods defined in a protocol. This second use is what I’m going to be pushing a bit further here.

Let’s start with a generic protocol with a generic name: Node. A node has a name and may have child nodes. Not all node types will have children however. The Node protocol will look like this:

protocol Node: class {

    /// The parent node this node belongs to, or `nil` if this is a root node.
    var parent: Node? { get }
    /// The index of this node within the parent node. `nil` if no parent.
    var indexInParent: Int? { get }

    /// The name of this node, typically a file name.
    var name: String { get }

    /// Number of children of this node
    var count: Int { get }
    /// Get a children of this node by its index.
    subscript (index: Int) -> Node { get }
    /// Get a children of this node by name, or `nil` if there is none.
    subscript (name: String) -> Node? { get }
    /// Names for all children of this node.
    var childrenNames: [String] { get }
    /// The index of the child node with `name`.
    func indexForName(name: String) -> Int?

    /// Insert a new node at the given index.
    func insert(node: Node, atIndex index: Int) throws
    /// Remove the node at the given index.
    func removeAtIndex(index: Int) throws

}

enum NodeError: ErrorType {
    case UnsupportedContent
}

Now that we have a protocol, we’ll want to implement some types conforming to that protocol. Some of those types will represent leaf nodes — nodes that will never have children. A simple implementation would look like this:

class ImageNode: Node {
    // Basic node implementation
    weak var parent: Node? = nil
    var indexInParent: Int? {
        return parent?.indexForName(name)
    }
    var name: String = ""

    // Boilerplate for a node with no children:
    var count: Int {
        return 0
    }
    subscript (index: Int) -> Node {
        fatalError()
    }
    subscript (name: String) -> Node? {
        return nil
    }
    var childrenNames: [String] {
        return []
    }
    func indexForName(name: String) -> Int? {
        return nil
    }
    func insert(node: Node, atIndex index: Int) throws {
        throw NodeError.UnsupportedContent
    }
    func removeAtIndex(index: Int) throws {
        fatalError()
    }
}

Oh oh… so much boilerplate for implementating the part of the node dealing with children! Imagine we now add a few other leaf node types, how many time are we going to rewrite all this? Worse, if we change or add a method to Node for children, we’ll have to revisit all the leaf types and make the corresponding change. Wouldn’t it be nice if all those classes could share the same implementation for the “no children” aspect of a node?

One way we can do this is by having a common base class for nodes with no children. But this does not compose well if we have multiple aspects we want to be able to mix together. For instance, our model might be composed of many “root” nodes (nodes with no parent), in which case the boilerplate for parent and indexInParent would have to be repeated everywhere in the same way. Some node types might be root nodes and at the same time have no children, and in this case which base class do we choose?

Contrary to class inheritance, protocols can be combined. So instead of creating a base class, let’s make this clever empty protocol, then accompany it with a protocol extension that implements the aspect of the Node protocol dealing with children:

protocol NoChildrenNode: Node {
}
extension NoChildrenNode {
    var count: Int {
        return 0
    }
    subscript (index: Int) -> Node {
        fatalError()
    }
    subscript (name: String) -> Node? {
        return nil
    }
    var childrenNames: [String] {
        return []
    }
    func indexForName(name: String) -> Int? {
        return nil
    }
    func insert(node: Node, atIndex index: Int) throws {
        throw NodeError.UnsupportedContent
    }
    func removeAtIndex(index: Int) throws {
        fatalError()
    }
}

Now we can remove the boilerplate from ImageNode, we just have to add the conformance to the NoChildrenNode protocol:

class ImageNode2: Node, NoChildrenNode {
    // Basic node implementation
    weak var parent: Node? = nil
    var indexInParent: Int? {
        return parent?.indexForName(name)
    }
    var name: String = ""
}

And this can be freely combined with other protocols to implement other aspects of our node. Note how the sole reason we have the NoChildrenNode protocol is to mix its protocol extension into ImageNode2? That’s why I call this protocol a mixin.

Let’s continue by implementing the root node aspect mentioned earlier:

protocol RootNode: Node {
}
extension RootNode {
    var parent: Node? {
        return nil
    }
    var indexInParent: Int? {
        return nil
    }
}

Our root node class that also has no children now becomes very straightforward to implement:

class RootImageNode: Node, RootNode, NoChildrenNode {
    // Basic node implementation
    var name: String = ""
}

All this is very interesting, but protocols can’t create stored properties. That limits the usefullness if we can’t store any state. Is there way to work around this? Sort of: just require a variable in the protocol and make use of it.

protocol NodeWithChildren: Node {
    var children: [Node] { get set }
}
extension NodeWithChildren {
    var count: Int {
        return children.count
    }
    subscript (index: Int) -> Node {
        return children[index]
    }
    subscript (name: String) -> Node? {
        guard let index = indexForName(name) else { return nil }
        return children[index]
    }
    var childrenNames: [String] {
        return children.map { $0.name }
    }
    func indexForName(name: String) -> Int? {
        return children.indexOf { $0.name == name }
    }
    func insert(node: Node, atIndex index: Int) throws {
        children.insert(node, atIndex: index)
    }
    func removeAtIndex(index: Int) throws {
        children.removeAtIndex(index)
    }
}

This implementation is far from optimal performance-wise, feel free to make a better one. The important point is that now, it becomes very easy to define a node with children:

class FolderNode: Node, NodeWithChildren {
    weak var parent: Node? = nil
    var indexInParent: Int? {
        return parent?.indexForName(name)
    }
    var name: String = ""

    // Required by NodeWithChildren:
    var children: [Node] = []
}

All we need is to add the children property that NodeWithChildren expects, and all the relevant methods get mixed into our class.

And we can still combine it with other mixin protocols. Here we create a root node with children with very little code:

class RootFolderNode: Node, NodeWithChildren, RootNode {
    var name: String = ""
    // Required by NodeWithChildren:
    var children: [Node] = []
}

Unlike classes, protocols are composable and we can combine them together in the same type. By using protocol extensions we can plug together code that represents different aspects of a type. This make it easy to create various types that follow a specific pattern but that have to differ in some other ways.

What I’ve shown here with classes can also work for structs and even enums by making them conform to our mixin protocols. Remember that, with classes, overriding in subclasses won’t work unless the method is part of a protocol the class implements. Methods solely present in an extension are statically dispatched and overriding them won’t work.

I haven’t touched the subject here, but we can also use associated types in our mixin protocols. We could for instance implement something that checks that all inserted nodes are of a specific type.

At the moment there seem to be a problem with setting the visibility of those protocols. If the Node protocol is public, the NoChildrenNode protocol has to be public also. This prevents us from making the implementation private or internal. Filled in SR-697.

Last thing, but that’s an important one: make sure not to abuse this by making things more complex than they should. Decomposing things into too many little pieces is going to make things complicated, so use this with a bit of restraint.

The Flower Icon

I’ve been using Acorn’s vector tools for a few years already. But Acorn 5 allowed me to literally abuse thanks to the shape processor1. And this resulted in the cute flower icon I now use in Sim Daltonism 2.

So how do we make that flower using Acorn 5? First we draw a shape for a petal, then we use the shape processor to make 12 copies, align them into a circle, and finally rotate them so they point all in the right direction. Easy since that’s exactly what the shape processor was designed to do.

But what about the disk in the middle? That’s a bit trickier, but we’ll still be using the shape processor. The idea is to have a lot of small shapes being placed semi-randomly in a circle and forming some sort of not-exactly regular gradient giving some apparence of volume.

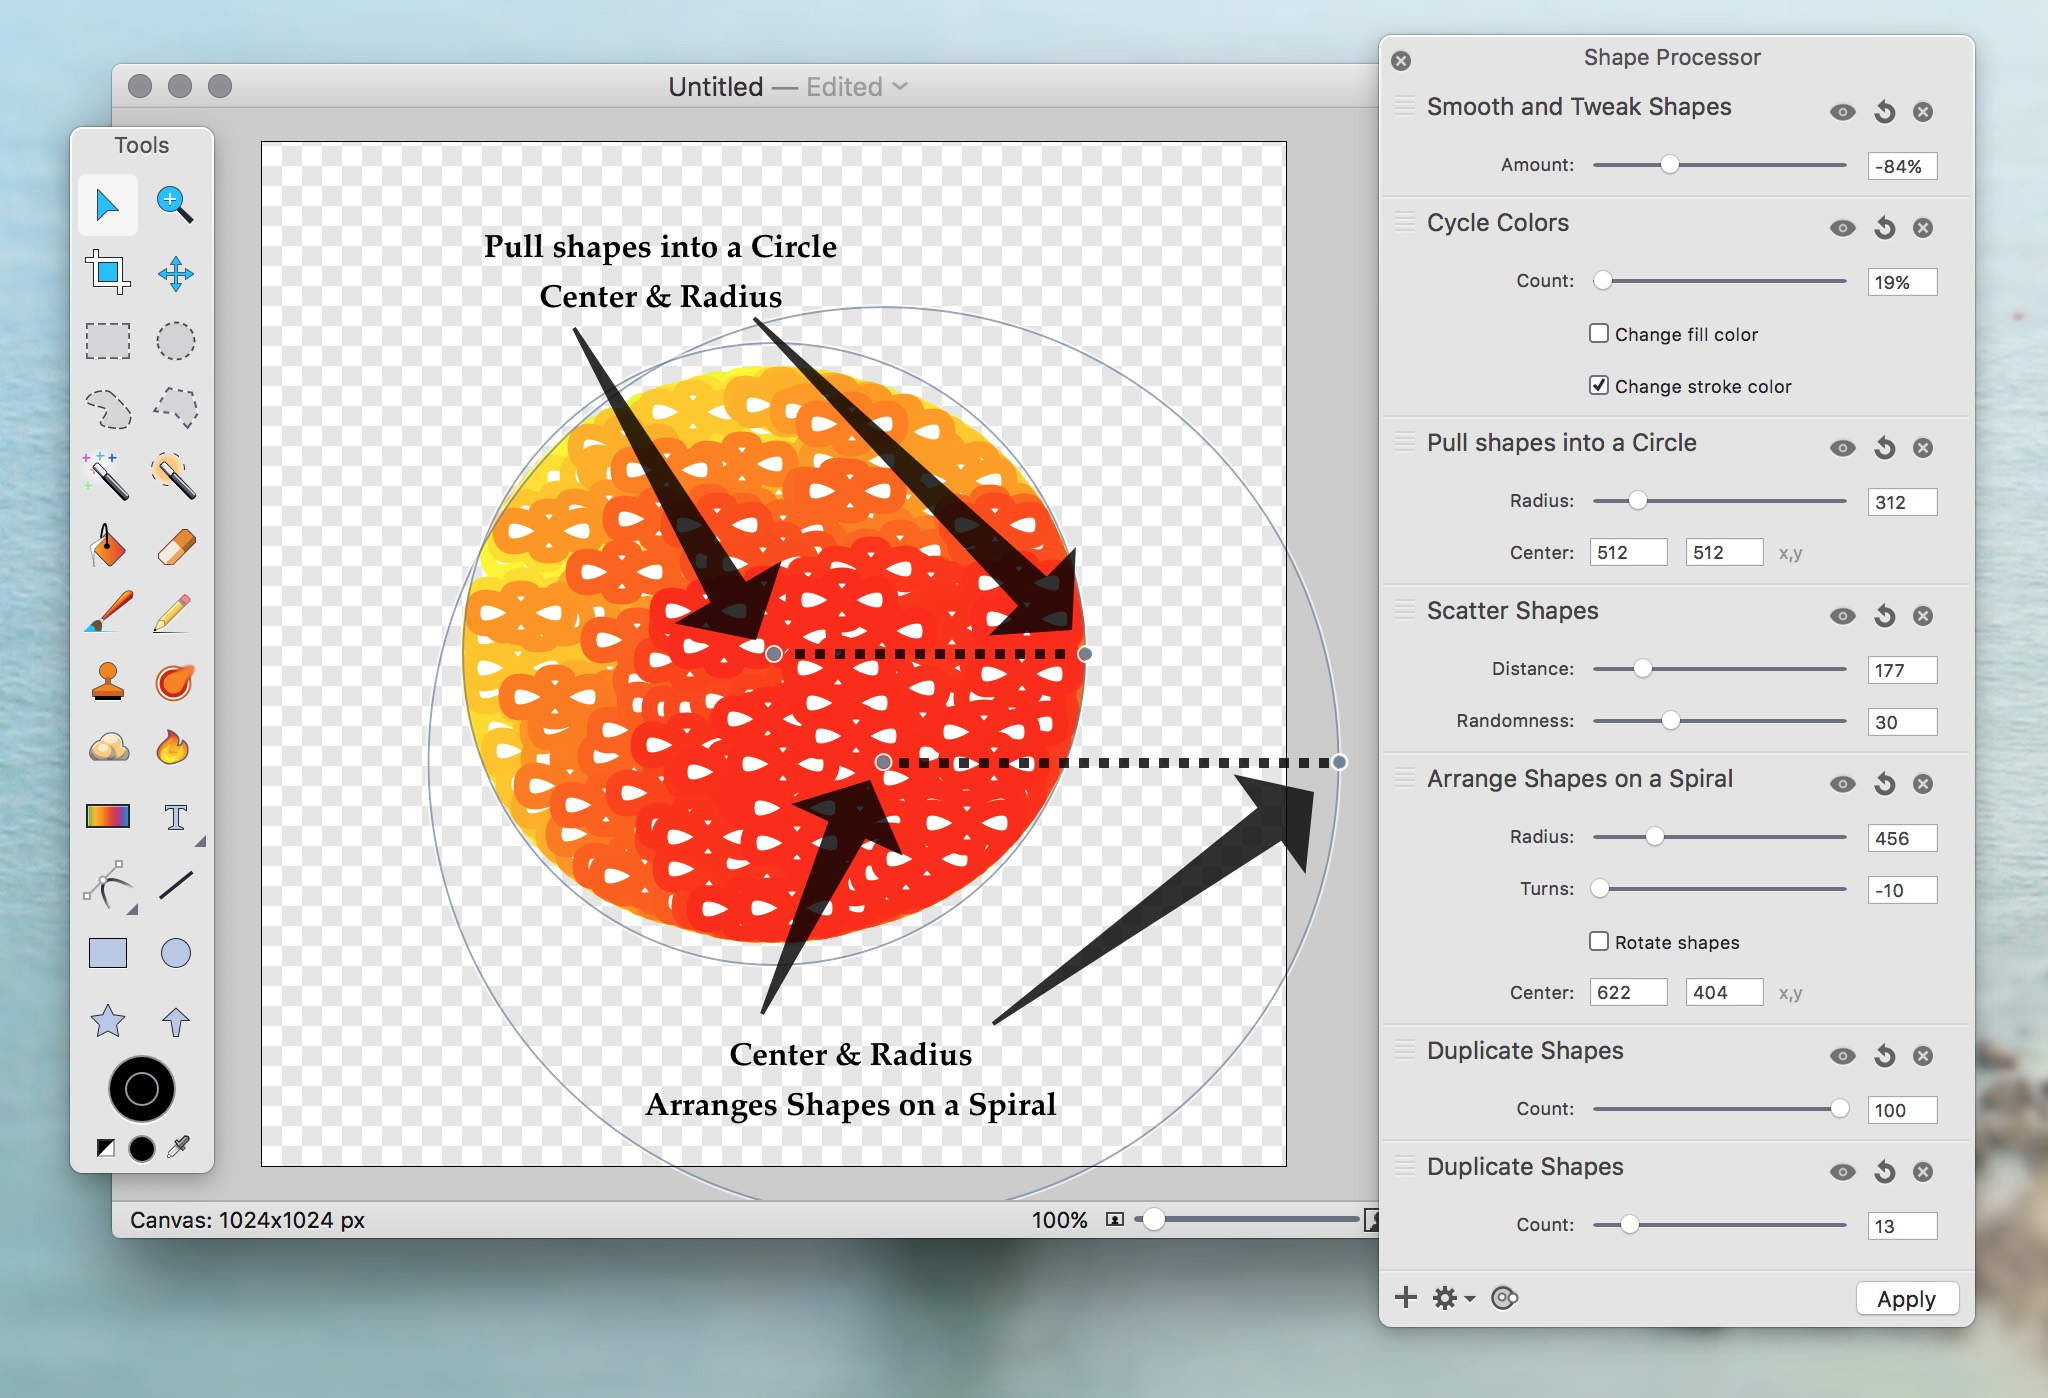
So here’s how: we start by drawing a small shape. Here I took an oval. Then we add a shape processor to duplicate this shape. Make a lot of them! The shape processor only allows us to make 100 duplicates, but if we need more we can stack up two duplicate processors one after the other: the second processor will duplicate all the shapes generated by the first processor, making the total number of shapes a multiplication.

Then we add a processor to arrange those shapes in a spiral, and another to cycle the color of the shapes. (It’s a bit inconvenient that we can only colorize using colors from the spectrum, but we can deal with that later with a Color Monochrome layer filter.) What the spiral does is put each shape at the approximative position we want them. If we want the bright spot to be at some place, adjust the parameters for those two filters to be there.

We don’t really want those shapes to be in a spiral, so let’s add a scatter processor. The idea is to arrange the scattering distance to get some sort of gradient from the shapes in the spiral.

Finally, we add a processor to pull all those shapes in a circle. The circle will need to be a bit smaller than the spiral, and for our fake gradient to work we need to make its center offset from the spiral’s center.

For my flower I added a smooth and tweak shapes processor to make those ovals no longer oval. That’s not necessary if we start from the right shape, but we can’t tweak the underlying shape without removing all the shape processors (and losing their settings). That said, we can tweak the parameters for all the processors and see how they affect the end result, so we can use this shape processor that does something to our shapes based on the value from a slider to change them a bit. All this to say that you might want to make sure you start from the shape you want right at the beginning.

I made a small test file you can download to experiment with. You’ll need Acorn 5 to open it and play with the shape processor. It looks like this:

By tweaking the spiral and scattering parameters you can acheive various levels of uneveness in the color distribution.

Remember when I said I abused the shape processor for making the icon for Sim Daltonism? The test file above has 1,300 shapes. Sim Daltonism’s flower has more than 22,000 shapes. It turns out that manipulating a big number of shape is not Acorn’s forte. You should probably avoid creating that many unless you like Acorn stalling on you when you manipulate those overpopulated shape layers. Either that, or you you could also rasterize the shape layer.

And if you want to have fun stalling Acorn, feel free to play with the Acorn file with all the 22,000 shapes in Sim Daltonism’s Github repository, here. Unfortunately, the processors have all been applied in that file so you can no longer tweak their parameters.

That concludes how to abuse of Acorn’s shape processor to make beautiful flowers. I hope you liked it.


  1. The shape processor is the new system in Acorn 5 allowing us to generate, move, and distord shapes in a similar way as applying filters to a layer. ↩︎


  • © 2003–2024 Michel Fortin.